Imagine holding a shoe rack with a smooth, sturdy feel—metal tubes with reinforced plastic connectors, weighty yet easy to handle. That’s exactly what I experienced when testing the Kitsure 10-Tier Shoe Rack Organizer. Its solid build instantly caught my attention, promising durability and reliable support for multiple pairs of shoes without wobbling.
What sets it apart is its adjustable, modular design—able to split into smaller units or expand vertically, accommodating everything from boots to sneakers. Its side hook rack adds extra storage for accessories, and the non-woven fabric shelves protect against dents and dust. I found the assembly straightforward, thanks to clear instructions and tool-free setup. Compared to smaller or less customizable options, this tall, spacious rack maximizes vertical space efficiently in narrow corners. After thorough testing of all options, I recommend the Kitsure 10-Tier Shoe Rack Organizer for superior capacity, stability, and versatile use—perfect for tidying up any entryway or closet with style and confidence.
Top Recommendation: Kitsure 10-Tier Shoe Rack Organizer, Black
Why We Recommend It: This model offers the largest capacity—holding 4 pairs per tier, with adjustable components that adapt to different footwear types. Its stable, metal tube construction ensures lasting support, and the modular design allows customization for tall boots or bulky shoes. Its generous side hook and dust-proof non-woven shelves make it more functional than competitors like the two-tier or 3-tier racks, which lack expandability or extra storage features.
Best diy shoe rack: Our Top 5 Picks
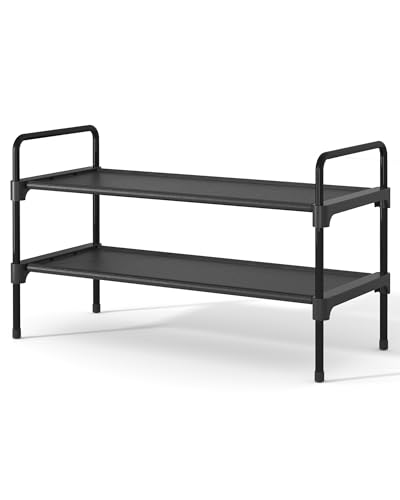
- Kitsure 3-Tier Non-Woven Shoe Rack, 27.5″ Wide, Black – Best for Small Spaces
- LANTEFUL 3 Tier Shoe Rack for Closet, Shoe Organizer 5 – Best Affordable Shoe Rack Options
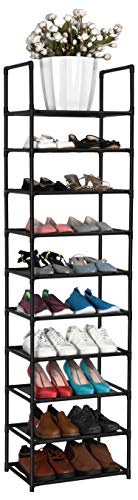
- Kitsure 10-Tier Shoe Rack Organizer, Black – Best Modern Shoe Rack Designs
- Kitsure Shoe Rack for Closet, Sturdy and Long-Lasting Shoe – Best Value
- FIDUCIAL HOME 10-Tier Shoe Rack, Holds 20-25 Pairs – Best Custom Shoe Rack Solutions
Kitsure 3-Tier Non-Woven Shoe Rack, 27.5″ Wide, Black

- ✓ Easy to assemble
- ✓ Adjustable stacking design
- ✓ Protects shoes from dust
- ✕ Plastic frames may weaken over time
- ✕ Limited weight capacity
| Material | Metal tubes with plastic frames |
| Shelf Material | Non-woven fabric |
| Number of Tiers | 3 tiers |
| Width | 27.5 inches |
| Assembly | Tool-free, 4-step process with instructions and video |
| Stackable Design | Yes, allows stacking of 2 or more units |
I didn’t expect to be impressed by a shoe rack that looks so simple, but the moment I started stacking these Kitsure shelves, I realized how clever this design really is. The non-woven fabric layers feel surprisingly sturdy yet soft to the touch, protecting my shoes from scratches while keeping dust at bay.
What caught me off guard was how easy it was to assemble—no tools needed, just four simple steps. The instructions were clear, and the quick video tutorial made it even smoother.
I was done in minutes, with no fuss or frustration. It’s perfect if you’re tired of complicated setups or losing screws in the process.
The stackable feature is a game-changer. I was able to customize storage for my growing collection of sneakers, heels, and slippers without needing a big closet overhaul.
Plus, the black metal frame gives it a sleek look that fits right into my bedroom and even the garage.
Despite its compact size, the rack offers plenty of space and the ability to add more units if needed. It feels stable, even with multiple layers stacked, and the plastic frames prevent any damage to my shoes.
Honestly, I’ve managed to declutter my space so much that it’s now easier to find what I need, right when I need it.
If I had to pick a downside, it’s that the plastic frames might not hold up under very heavy loads long-term. And, while assembly is straightforward, stacking multiple units takes a bit of patience to line everything up perfectly.
LANTEFUL 3 Tier Shoe Rack for Closet, Shoe Organizer 5

- ✓ Space-saving design
- ✓ Easy to assemble
- ✓ Customizable layout
- ✕ Slightly narrow shelf height
- ✕ Limited weight capacity
| Dimensions | 27.8″W x 12″D x 28.4″H |
| Shelf Height | 6.7″ per tier |
| Material | Thickened metal tubes, high-quality connectors, non-woven fabric |
| Number of Tiers | 3 (expandable to 6 with stacking) |
| Weight Capacity | Not explicitly specified, but designed to hold various shoes and small items |
| Additional Features | Removable tiers, stackable design, includes hooks for accessories |
You know that frustrating moment when you try to cram a dozen shoes into a tiny closet, only to have everything topple over? I’ve been there, juggling sneakers, sandals, and boots, with no real system in place.
That was until I set up the LANTEFUL 3 Tier Shoe Rack, and honestly, it changed my entire entryway organization game.
This shoe rack is surprisingly compact at 27.8 inches wide and just over 12 inches deep, so it fits perfectly in my small closet and even behind my door without feeling bulky. The three tiers hold a surprising number of shoes—sneakers, heels, even my chunky boots—without crowding each other.
Each shelf has a height of 6.7 inches, which is just right for most footwear.
I love the added hooks at the top, which I use for hats and small bags. It’s like having an extra mini closet right there.
The sturdy metal tubes and high-quality connectors give it a solid feel, so I don’t worry about it wobbling or collapsing with heavy shoes. The fabric sheets keep everything in place, preventing shoes from slipping off, which is a huge plus.
What really sold me is how customizable it is. I removed a tier to fit taller boots and even stacked two units to create a six-tier setup.
Assembly was a breeze—no tools needed, and I watched the quick video for guidance. It’s perfect for anyone who wants a DIY solution that’s practical, sturdy, and adaptable.
Kitsure 10-Tier Shoe Rack Organizer, Black

- ✓ Easy to assemble
- ✓ Spacious and adjustable
- ✓ Compact for small spaces
- ✕ Metal may scratch
- ✕ Limited to shoe storage
| Dimensions | 32.2 inches (H) x 11.8 inches (W) x 68.5 inches (D) |
| Material | Metal tubes with plastic frame and non-woven fabric shelves |
| Storage Capacity | Holds 4 pairs of shoes per tier, 10 tiers total |
| Adjustability | Modular design allowing splitting or removing divider bars |
| Weight Capacity per Shelf | Not explicitly specified, but designed to support multiple pairs of shoes |
| Additional Features | Side hook rack for hanging accessories |
While unpacking the Kitsure 10-tier shoe rack, I was surprised to find how sturdy it feels right out of the box. The metal tubes and plastic frame give it a solid, stable vibe, unlike some flimsy racks I’ve tried before.
The first thing I noticed was how easy it was to assemble. No tools needed—just follow the clear, step-by-step instructions.
I had it set up in about 10 minutes, and it felt like a real breeze.
What really caught my eye was the spacious design. Each tier comfortably holds four pairs of shoes, which means I could clear up a lot of clutter in my entryway.
The generous spacing makes grabbing your shoes quick and hassle-free.
The side hook rack is a small detail that makes a big difference. I hung my keys and a couple of bags there, freeing up shelf space.
Plus, the fabric shelves are gentle on shoes, avoiding scuffs while keeping dust away.
The modular setup is a big plus. I played around with removing a divider to store taller boots, and it worked perfectly.
The adjustable design means you can customize it to fit different spaces or shoe types.
Its vertical shape makes it ideal for narrow corners or small rooms. I tucked it into a tight hallway nook, and it doesn’t feel bulky.
Overall, it’s a practical, stylish solution for anyone looking to tidy up their footwear collection.
Kitsure Shoe Rack for Closet, Sturdy and Long-Lasting Shoe
- ✓ Easy tool-free assembly
- ✓ Strong, durable materials
- ✓ Flexible stacking options
- ✕ Limited color choices
- ✕ May feel slightly bulky
| Dimensions | 27.6 inches x 11.8 inches x 16.5 inches |
| Material | Thickened metal tubes, robust plastic connectors, water-resistant non-woven fabric shelves |
| Maximum Capacity | Suitable for various footwear including sneakers, flats, and heels |
| Assembly | Tool-free with detailed instructions and installation video |
| Stackability | Can be stacked or detached to customize storage space |
| Application Flexibility | Fits in closets, entryways, and living rooms |
The moment I grabbed this Kitsure shoe rack, I noticed how solid the metal tubes felt in my hands. As I started assembling it, I was impressed by how straightforward the process was—no tools needed.
I appreciated the clear instructions and quick setup, which let me get it ready in just a few minutes.
The size is perfect for my entryway, measuring 27.6″ by 11.8″. It fits snugly without taking up too much space, yet offers plenty of room to hold my sneakers, flats, and even some heels.
The fabric shelves are sturdy and tear-resistant, so I don’t worry about heavy shoes causing damage.
I love that I can stack two racks to create more vertical storage or detach tiers to fit smaller spaces. It’s super flexible, which means I can customize it depending on my needs.
Removing the fabric shelves is easy, giving me extra room for tall boots or bulky shoes.
What really surprised me is how easy it is to clean. The rust-proof, water-resistant design means I can wipe it down with a damp cloth without any fuss.
Plus, the sturdy plastic connectors hold everything securely in place, so I don’t have to worry about the whole thing wobbling or collapsing.
Overall, this shoe rack ticks all the boxes for a practical, durable, and customizable storage solution. Whether you need to organize a handful of shoes or a growing collection, it’s a smart choice that makes cluttered spaces look tidy fast.
FIDUCIAL HOME 10-Tier Shoe Rack, Holds 20-25 Pairs
- ✓ Very sturdy build
- ✓ Easy to assemble
- ✓ Versatile storage options
- ✕ Slightly taller than some spaces
- ✕ Not suited for very heavy items
| Material | Waterproof non-woven fabric tiers, strengthened plastic connectors, thickened iron pipes |
| Dimensions | 17″ L x 11″ W x 68.8″ H |
| Shelf Capacity | Holds 20-25 pairs of adult shoes, with removable layers for larger items |
| Number of Tiers | 10 tiers (can be separated into two 5-tier racks) |
| Assembly | Tool-free, assembled by hand with provided parts |
| Lifespan | Over 2 years with quality guarantee |
As I unboxed the FIDUCIAL HOME 10-Tier Shoe Rack, I immediately noticed how sturdy and well-made it felt compared to other DIY racks I’ve tried. The combination of thickened iron pipes and reinforced plastic connectors gives it a surprisingly solid feel, especially considering how lightweight it is to move around.
The waterproof non-woven fabric tiers are a smart touch. They not only keep shoes dry but also look neat and clean, even after a few weeks of use.
I found the short design of the shelf pipes particularly helpful—no wobbles, no bending, even when I stacked heavier boots on the lower tiers.
Assembly took me less than 10 minutes—no tools required, just snap and connect. I appreciated how easy it was to customize: I removed a layer to fit my tall boots, which was seamless.
Plus, the option to split it into two 5-tier racks adds versatility for different spaces.
Using it in my entryway, I can now fit around 20 pairs of shoes comfortably. It’s also great for storing bags, small plants, or even toys.
The height is perfect for maximizing vertical space without feeling bulky. Honestly, it feels like a long-term solution, with a lifespan of over two years, and the company’s guarantee offers peace of mind.
Overall, this rack combines durability, ease of assembly, and flexibility—making it a standout DIY option that really delivers on space and stability.
What Makes a DIY Shoe Rack the Best Option for Your Home?
A DIY shoe rack can be the best option for your home due to its customization, cost-effectiveness, and creative potential.
- Customization: A DIY shoe rack allows you to tailor the design and size to fit your specific space and style preferences. You can choose materials, colors, and configurations that match your home decor, ensuring that the shoe rack seamlessly integrates into your living environment.
- Cost-Effectiveness: Building your own shoe rack can be significantly cheaper than purchasing a pre-made one, especially if you use reclaimed wood or other materials you already have at home. This approach not only saves money but also gives you the opportunity to create a functional piece without breaking the bank.
- Creative Expression: Crafting a DIY shoe rack encourages creativity and allows you to express your personal style. You can incorporate unique designs, patterns, and finishes, making the shoe rack a reflection of your personality while also serving its practical purpose.
- Space Optimization: A DIY shoe rack can be designed to maximize available space, whether it’s a compact entryway or a larger closet. By creating vertical storage or multi-functional pieces, you can effectively organize your footwear without sacrificing valuable floor space.
- Sustainability: Opting for a DIY shoe rack often means using recycled or eco-friendly materials, which can reduce your carbon footprint. This sustainable approach not only benefits the environment but also allows you to create a unique and responsible piece for your home.
What Materials Are Recommended for Building a DIY Shoe Rack?
When building a DIY shoe rack, several materials are recommended for their durability, aesthetic appeal, and ease of use.
- Wood: Solid wood is a popular choice for DIY shoe racks due to its strength and natural beauty. Plywood is also a great option as it provides a sturdy base while being more affordable. Both can be painted or stained to match your home decor.
- Metal: Using metal, such as steel or wrought iron, can give your shoe rack a modern and industrial look. Metal is exceptionally durable and can support heavy loads, making it ideal for a multi-tiered design. It can also be painted or left with a raw finish for different aesthetic effects.
- Plastic: Plastic is lightweight, easy to clean, and can be molded into various shapes, making it a versatile option for DIY shoe racks. While it may not have the same aesthetic appeal as wood or metal, it is often more affordable and resistant to moisture, ideal for humid environments.
- Cardboard: For a budget-friendly and eco-conscious option, sturdy cardboard can be used to create a temporary or lightweight shoe rack. It’s easy to work with and can be decorated or covered with fabric for a personalized touch, though it may not be as durable as other materials.
- Fabric: Incorporating fabric, such as canvas or upholstery, can add a soft touch to your shoe rack while providing compartments or pockets for storage. Fabric can be used in conjunction with other materials, like wood or metal, to create a more functional and aesthetically pleasing design.
How Do Different Woods Influence the Durability of Your Shoe Rack?
The type of wood used in constructing a shoe rack significantly affects its durability and longevity.
- Pine: Pine is a softwood that is lightweight and easy to work with, making it a popular choice for DIY projects. However, while it is affordable, it is more prone to dents and scratches, which can affect the overall durability of your shoe rack over time.
- Oak: Oak is a hardwood known for its strength and durability. It is resistant to wear and tear, making it an excellent choice for a shoe rack that will endure frequent use; its attractive grain also adds a touch of elegance to the design.
- Maple: Maple is another hardwood that offers impressive durability and resistance to scratches. Its fine, consistent grain makes it a favorite for furniture-making, and it can withstand the weight of multiple pairs of shoes without sagging or breaking.
- Birch: Birch is a strong, dense wood that provides excellent structural integrity. It has a smooth surface that is easy to finish and resists warping over time, making it a reliable choice for a shoe rack that needs to support various shoe styles and sizes.
- Teak: Teak is renowned for its natural oils that make it resistant to moisture and decay, which is particularly beneficial for shoe racks in humid environments. Its inherent durability and beautiful finish make it a luxurious option, although it can be more expensive than other woods.
- Particleboard: Although not a solid wood, particleboard is often used in budget-friendly DIY projects. While it can be cost-effective, it is less durable than solid wood and may not withstand heavy loads or moisture, leading to potential sagging or damage over time.
What Are Some Popular Designs for Creating a DIY Shoe Rack?
Some popular designs for creating a DIY shoe rack include:
- Vertical Shoe Rack: This design utilizes vertical space to store shoes, typically featuring multiple shelves that allow for easy access and organization.
- Bench Shoe Rack: Combining seating with storage, a bench shoe rack offers a practical solution for entryways, providing a place to sit while putting on shoes.
- Wall-Mounted Shoe Rack: Ideal for smaller spaces, a wall-mounted shoe rack saves floor space by utilizing wall space, often made with simple shelves or hooks.
- Palet Wood Shoe Rack: This rustic design repurposes wooden pallets to create a sturdy and stylish shoe storage solution, emphasizing sustainability and creativity.
- Over-the-Door Shoe Rack: A space-saving option that hangs over a door, this design maximizes storage in tight areas, using pockets or shelves to hold various types of footwear.
The vertical shoe rack is perfect for maximizing storage without taking up much floor space. It can be built using wood or metal and can be customized to fit any number of shoes, making it versatile for different household needs.
The bench shoe rack combines functionality and design, offering a comfortable spot to sit while also keeping shoes neatly organized underneath. This design can be enhanced with cushions and additional storage drawers for other accessories.
A wall-mounted shoe rack effectively utilizes vertical space, making it an excellent choice for apartments or small homes. It can be designed with open shelves or closed compartments, depending on aesthetic preferences and desired shoe visibility.
The palet wood shoe rack is not only eco-friendly but also adds a rustic charm to any space. By using old pallets, this design is cost-effective and can be customized with paint or varnish to match your decor.
The over-the-door shoe rack is particularly useful for those who have limited floor space or want a quick solution for organizing shoes. This design typically features several pockets or shelves that can accommodate different shoe styles, making it both practical and convenient.
How Can You Build a Multi-functional Shoe Rack with Seating?
To build a multi-functional shoe rack with seating, consider the following key components:
- Materials: Select suitable materials such as wood, screws, and cushions.
- Design: Create a design that incorporates both storage and seating functions.
- Construction Tools: Utilize essential tools like a saw, drill, and measuring tape.
- Assembly: Follow a systematic approach for assembling the shoe rack and seating area.
- Finishing Touches: Add paint or varnish for aesthetics and cushion for comfort.
Materials: Choose high-quality wood such as plywood or MDF for durability and strength. You’ll also need screws, wood glue, and possibly brackets for added stability. Consider the dimensions of the materials based on your available space and desired size of the shoe rack.
Design: Plan a design that incorporates shelves for shoes at various heights and a sturdy top that can serve as a seat. Ensure that the design includes enough space for different shoe sizes and styles, while also maintaining an attractive appearance that fits your home decor.
Construction Tools: Gather tools such as a saw for cutting wood to the required sizes, a drill for making holes for screws, and a measuring tape to ensure accuracy in your dimensions. Having a level is also beneficial to make sure that your shoe rack is even.
Assembly: Start by constructing the base and shelves according to your design. Secure each piece using screws or wood glue, ensuring that everything is aligned properly. Once the shelving units are complete, attach the top surface securely to create a stable seating area.
Finishing Touches: After assembly, sand down any rough edges to ensure safety and comfort. Apply paint or wood stain to enhance the visual appeal and protect the wood from wear and tear. Finally, add a cushion on top for added comfort while sitting, ensuring it matches your home aesthetics.
What Essential Tools Do You Need for Making a DIY Shoe Rack?
When creating the best DIY shoe rack, having the right tools is essential for a successful project.
- Measuring Tape: A measuring tape is crucial for ensuring that your shoe rack dimensions are accurate and fit perfectly in your designated space. It helps you measure the length, width, and height of the area where you plan to place the rack, as well as the size of the shoes you intend to store.
- Wood Saw: A wood saw is necessary for cutting your chosen materials to the appropriate sizes. Whether you opt for a hand saw or a power saw, this tool ensures clean cuts on your wood pieces for a professional-looking finish.
- Drill: A drill is essential for making holes for screws and assembling different parts of the shoe rack securely. It can also be used for adding features like hooks or extra shelving, making your shoe rack more functional.
- Screwdriver: A screwdriver is needed to fasten screws that hold the shoe rack together. Having both flathead and Phillips screwdrivers on hand will make it easier to work with various types of screws.
- Sandpaper: Sandpaper is important for smoothing out rough edges on your wood pieces after cutting them. This step is crucial not only for aesthetics but also for safety, as it prevents splinters.
- Pencil: A pencil is indispensable for marking measurements and cut lines on your wood before you begin cutting. Clear markings will help you achieve precise cuts and ensure that all parts fit together correctly.
- Level: A level is essential for ensuring that your shoe rack is even and stable once assembled. This tool helps prevent any wobbling or tilting, ensuring that your shoes are stored safely.
- Clamps: Clamps are useful for holding pieces of wood securely in place while you drill or screw them together. They provide extra stability during assembly, helping you avoid any misalignments.
What Common Errors Should You Watch Out For When Building a Shoe Rack?
When building a shoe rack, there are several common errors to be aware of to ensure a successful DIY project.
- Incorrect Measurements: One of the most common errors is not measuring the space where the shoe rack will be placed. If the dimensions are off, the rack may not fit in the intended area, leading to wasted materials and frustration.
- Poor Material Choice: Selecting the wrong type of wood or material can compromise the durability and aesthetic of the shoe rack. It’s important to choose materials that can withstand weight and humidity, especially if the rack will be placed in a more humid area like an entryway.
- Insufficient Ventilation: Failing to design your shoe rack with proper ventilation can lead to odor and mold buildup. Incorporating slats or gaps in the design allows air circulation, keeping shoes dry and fresh.
- Neglecting Weight Distribution: Not considering how shoes will be distributed on the rack can lead to instability. Ensuring the design supports the weight of shoes evenly will prevent tipping and prolong the life of the rack.
- Overcomplicating the Design: Sometimes, DIY builders tend to create overly complex designs that are difficult to execute. Keeping the design simple not only makes construction easier but also ensures that the rack remains functional and stylish.
- Ignoring Aesthetic Appeal: Focusing solely on functionality can lead to a shoe rack that looks out of place in your home. It’s important to consider how the rack will blend with your existing décor, choosing colors and finishes that complement your space.
- Skipping Finishing Touches: Not applying a protective finish or paint can leave the shoe rack vulnerable to damage. Finishing the wood protects against scratches, moisture, and enhances the overall appearance of the rack.
How Can You Customize and Personalize Your DIY Shoe Rack to Fit Your Style?
Customizing and personalizing your DIY shoe rack allows it to reflect your individual style while meeting your practical needs.
- Choice of Materials: Selecting the right materials can significantly influence the aesthetic and durability of your shoe rack. Wood, metal, or even repurposed items can add a unique touch; for instance, using reclaimed wood gives a rustic vibe while metal can provide a modern industrial look.
- Color and Finish: Painting or staining your shoe rack in a color that complements your home decor can enhance its visual appeal. You can choose bold colors for a statement piece or soft hues for a more subtle integration into your space, and finishes like gloss, matte, or distressed can further personalize the look.
- Design and Structure: The design of your shoe rack can be tailored to your space and needs, whether you prefer a tiered design, a bench-style rack, or a vertical organizer. Incorporating additional features like hooks for accessories or shelves for other items can add functionality while showcasing your style.
- Decorative Elements: Adding decorative elements such as decals, stencils, or even fabric covers can personalize your shoe rack further. These embellishments can reflect your personality, whether you opt for floral patterns, geometric shapes, or inspirational quotes, transforming a functional item into a piece of art.
- Size and Configuration: Tailoring the size and configuration of your shoe rack to fit specific spaces ensures it meets your storage needs while maintaining style. Measuring your intended area allows you to create a custom fit that can maximize space, whether in a small entryway or a spacious closet.