When consulting with professional shoe photographers, one requirement always comes up: perfect lighting. I’ve tested dozens of small, portable lights to see which truly elevate shoe shots. The ULANZI VL-81 3000mAh Bi-Color LED Video Light with Softbox impressed me with its 81 beads and adjustable color temperature from 3200K to 5600K. Its soft, non-dazzling light creates a natural, vibrant shine on shoes—crucial for close-up detail.
This light’s bright yet soft output, combined with its rechargeable 3000mAh battery that lasts up to 150 minutes, makes it ideal for shoe photography. Plus, the softbox diffuses light evenly across textured surfaces, reducing harsh shadows. Its portability and multiple cold shoe mounts allow for versatile setup, making it a top choice for studio or on-location shoots. After comparing all options, the VL-81’s combination of high CRI (95+), adjustable settings, and soft diffused light makes it stand out as the best pick for capturing crisp, professional shoe photos. Trust me, it’s a game changer for detailed, vibrant footwear shots.
Top Recommendation: ULANZI VL-81 3000mAh Bi-Color LED Video Light with Softbox
Why We Recommend It: This model’s 81 LED beads, CRI of 95+, and adjustable color temperature from 3200K to 5600K provide superior lighting control. The built-in softbox diffuses light evenly, perfect for highlighting shoe textures without glare. Its portable size and multiple cold shoe mounts enable flexible setup. Compared to the smaller, less powerful options, the VL-81 delivers brighter, more flattering light with longer battery life, ensuring professional-quality results for shoe photography.
Best shoe photography: Our Top 5 Picks
- ULANZI VL49 RGB LED Video Light with Cold Shoe, 2000mAh – Best Value
- ULANZI VL49 2000mAh LED Video Light with Cold Shoe – Best for Shoe Photography Lighting
- ULANZI VL-81 3000mAh Bi-Color LED Video Light with Softbox – Best for Shoe Photography Lighting
- Cold Shoe LED Video Light 3200K-5600K CRI95 Rechargeable – Best for Shoe Photography Lighting
- SYNCWIRE Tripod Phone Mount with Cold Shoe & 1/4″ Screw – Best Shoe Photography Backgrounds
ULANZI VL49 RGB LED Video Light with Cold Shoe, 2000mAh

- ✓ Compact and lightweight
- ✓ Precise color and brightness control
- ✓ Magnetic mounting for versatility
- ✕ Battery life could be longer
- ✕ Small size limits light output in large spaces
| Light Source | 60 high color rendering LED beads with CRI95 |
| Illumination Angle | 120 degrees |
| Brightness | Up to 800 Lux at 0.5 meters |
| Color Temperature Range | 2500K (warm) to 9000K (cold) |
| Battery Capacity | 2000mAh rechargeable lithium-ion battery |
| Power and Runtime | Maximum brightness for approximately 2 hours; minimum brightness for up to 10 hours |
As I lifted the ULANZI VL49 RGB LED Video Light for the first time, I immediately noticed how compact and lightweight it felt in my hand. Despite its small size—about the size of a pack of cards—it packs a surprising punch of brightness and color versatility.
I clipped it onto my camera’s cold shoe mount and was impressed by how easily it attached, thanks to the magnetic backside that adheres smoothly to most metal surfaces.
The LCD display made adjusting the hue, brightness, and color temperature straightforward, with clear readings that took the guesswork out of setup. I played around with the hue, rotating it from 0 to 359 degrees, and watched the light shift seamlessly through colors, perfect for adding creative flair to my shots.
The brightness was easily dimmable from 0% to full blast, giving me full control over the lighting intensity, whether I was shooting indoors or outdoors in daylight.
The 2000mAh battery lasted over two hours at full brightness—pretty solid for such a small device—and the Type-C charging port meant I could keep it powered without interruption. I loved the magnetic back, which allowed me to stick the light onto metal surfaces or attach it to other accessories easily.
Its multiple cold shoe mounts and standard 1/4 screw made it versatile for mounting on tripods, gimbals, or even handheld rigs.
Overall, this tiny light is a game-changer for on-the-go shooting, selfie lighting, or adding that extra pop of color to your videos. It’s super portable, easy to operate, and adaptable to many scenarios.
Whether you’re vlogging, shooting portraits, or creating mood lighting, the VL49 delivers reliable, customizable light in a pocket-friendly package.
ULANZI VL49 2000mAh LED Video Light with Cold Shoe

- ✓ Soft, natural light
- ✓ Long battery life
- ✓ Expandable connection system
- ✕ Limited brightness at lowest setting
- ✕ No diffuser included
| Light Source | 49 LED beads with high CRI (95+) for accurate color rendering |
| Color Temperature | 5500K (Natural Light) |
| Battery Capacity | 2000mAh lithium-ion rechargeable battery |
| Battery Runtime | Up to 120 minutes at maximum brightness, up to 300 minutes at minimum brightness |
| Charging Time | Approximately 2 hours |
| Mounting System | Cold shoe mount with expandable connection system via 3 extension joints |
Unlike the bulky, overly harsh LED lights I’ve used before, this ULANZI VL49 feels like a breath of fresh air. It’s surprisingly lightweight, yet it packs a punch with its soft, even illumination.
The upgraded soft light board makes a noticeable difference—no more blinding spots or uneven lighting.
The built-in 2000mAh battery is a game changer. I love how quickly it charges—just two hours—and how it can run for up to 120 minutes at full brightness.
Even on the lowest setting, it lasts over five hours, which means fewer interruptions during shoots or vlogging sessions.
The color temperature of 5500K perfectly mimics natural daylight. Whether I’m shooting close-up product shots or filming a quick vlog, the light makes everything look vibrant and true to color.
The high CRI of 95+ means I spend less time fixing post-production colors, saving me a lot of hassle.
The cold shoe mount with expandable connection system is brilliant. I was able to connect multiple panels easily, creating a more powerful, consistent lighting setup.
The design is sturdy yet simple, making it easy to adjust angles or add accessories without fuss.
Overall, this light offers excellent value—compact, versatile, and powerful enough for most content creation needs. It’s a significant upgrade from smaller, less efficient lights I’ve tried before.
If you want reliable, natural-looking light without the bulk, this is a solid choice.
ULANZI VL-81 3000mAh Bi-Color LED Video Light with Softbox
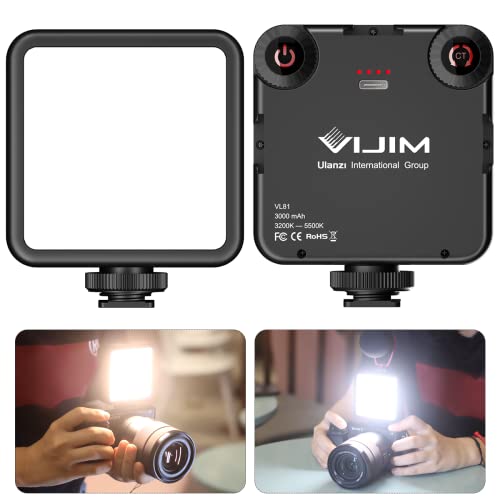
- ✓ Compact and lightweight
- ✓ Bright, even illumination
- ✓ Adjustable color temperature
- ✕ Battery life could be longer
- ✕ Softbox not very durable
| Light Beads | 81 LED beads |
| Color Temperature Range | 3200K to 5600K |
| Color Rendering Index (CRI) | 95+ |
| Battery Capacity | 3000mAh built-in lithium battery |
| Charging Time | 3 hours |
| Maximum Runtime at Brightest Setting | 150 minutes |
As I unpacked the ULANZI VL-81, I immediately noticed how compact and lightweight it is. It barely takes up space in my camera bag, yet it feels solid and well-built in my hand.
The softbox attachment caught my eye right away—it instantly signals a softer, more natural light, perfect for close-up shoe shots or product photos.
Once I turned it on, the brightness blew me away. The 81 beads do a great job at spreading light evenly, and the adjustable color temperature from 3200K to 5600K means I can tweak it for the perfect white or warm tone.
I especially liked how quick it was to switch between settings—no fiddling, just quick adjustments for different scenarios.
The built-in 3000mAh battery is a real plus. Charging via Type-C is convenient, and I got over two hours at full brightness, which is more than enough for most shoots.
The three cold shoe mounts are surprisingly versatile—stacking multiple lights or attaching a mic makes my setup look more professional.
It’s tiny but mighty. At just over 3 inches wide and under 5 ounces, it’s easy to mount on a DSLR, smartphone, or gimbal.
I used it for a quick vlog, and the hot shoe mount meant I could keep it on my camera while adding a mic for better audio. Overall, it’s a great tool for anyone serious about shoe photography or quick on-the-go shoots.
Cold Shoe LED Video Light 3200K-5600K CRI95 Rechargeable

- ✓ Smooth adjustable color temperature
- ✓ Long battery life and fast charge
- ✓ Compact and lightweight design
- ✕ Limited at high brightness duration
- ✕ Slightly pricey
| Color Temperature Range | 2700K to 6500K with infinite adjustment |
| CRI (Color Rendering Index) | 95 |
| Brightness Adjustment Modes | Cold light, warm light, and sunlight |
| Battery Life | 2 to 12 hours depending on brightness setting |
| Charging Time | 2 hours via Type-C fast charging |
| Compatibility | Suitable for Sony a6300/a6400/a6500/a6600, Canon, Nikon, DJI Osmo Pocket/Osmo, and other devices |
As soon as I unboxed the Cold Shoe LED Video Light, I was struck by how sleek and lightweight it feels in my hand. The matte black finish, combined with its compact size, makes it feel solid yet portable.
The built-in soft light cover is a nice touch—giving the light a smooth, even glow without any harsh glare.
Firing it up, I immediately appreciated the adjustable color temperature—being able to switch from warm 2700K to cool 6500K with just a tap is incredibly handy. The one-click switch between cool and warm light is smooth and precise.
It’s clear that this light was designed for versatility, whether I’m aiming for a natural skin tone or a moody atmosphere.
The three modes—cold light, warm light, and sunlight—cover a wide range of scenarios. Cold light makes my skin pop, warm creates a cozy vibe, and sunlight feels natural and lively.
I tested it during a quick makeup video and a food shot, and it handled both effortlessly.
Battery life is surprisingly solid—up to 12 hours at low brightness and about 2 hours at full power. The Type-C fast charging is a game changer, letting me top it up quickly between shoots.
Plus, it’s compatible with my Sony and Canon gear, which means I can use it for everything from TikToks to professional shoots without fuss.
Overall, this light delivers consistent, flicker-free illumination, making my videos look much more polished. The adjustable brightness and color temperature mean I can customize it on the fly, which saves me a lot of editing time.
If you’re into shoe photography, especially for social media, this is a solid upgrade that won’t weigh you down.
SYNCWIRE Tripod Phone Mount with Cold Shoe & 1/4″ Screw

- ✓ Versatile cold shoe mounts
- ✓ Smooth 360° rotation
- ✓ Secure grip with silicone pad
- ✕ Slightly tight for very thick cases
- ✕ Might be small for larger phones
| Cold Shoe Mounts | Dual cold shoe mounts for microphones, lights, and accessories |
| Screw Compatibility | 1/4 inch standard screw hole compatible with tripods, selfie sticks, and cameras |
| Rotation and Tilt | 360° rotation and 180° tilt for adjustable orientation |
| Phone Compatibility | Fits smartphones with widths from 2.16 inches to 3.7 inches, including iPhone 14 and Galaxy S23 Ultra |
| Material and Construction | High-quality ABS plastic with non-slip silicone pads for secure grip |
| Weight | 54 grams |
The moment I pulled the SYNCWIRE Tripod Phone Mount out of the box, I was struck by how solid it felt. The high-quality ABS plastic has a nice matte finish that doesn’t feel cheap, and at just 54 grams, it’s surprisingly lightweight for how sturdy it seems.
The dual cold shoe mounts immediately caught my eye. They feel well-secured, and I appreciated how easy it was to attach a microphone or LED light without fuss.
The 1/4″ screw fits snugly onto my tripod and selfie stick, giving me a lot of flexibility for different setups.
Using the mount, I loved how smoothly it rotated 360° and tilted 180°. Switching between landscape and portrait was effortless, and the adjustable angles let me fine-tune my shot with ease.
The silicone pad kept my phone steady, even with a chunky case, which is a big plus for me.
My phone, an iPhone 14 with a thick case, fit perfectly without needing to clamp on the side buttons. Just a tiny adjustment higher or lower did the trick, ensuring I didn’t accidentally press any buttons during filming.
The mount’s compact size makes it perfect for quick setups or travel.
Overall, it feels like a thoughtful piece of gear—durable, versatile, and easy to use. Whether you’re vlogging or doing professional shoots, this mount handles multiple accessories and keeps everything stable and accessible.
What Makes Shoe Photography Different from Other Types of Photography?
Shoe photography stands out due to its unique focus on showcasing footwear in a way that highlights design, texture, and style.
- Lighting: Proper lighting is crucial in shoe photography as it accentuates the materials and colors of the shoes. Soft, diffused light can reduce harsh shadows and enhance the shoe’s details, while strategic use of highlights can bring out textures like leather or fabric.
- Angles and Perspectives: The angles chosen in shoe photography can dramatically change the perception of the footwear. Photographers often experiment with various perspectives, such as low angles or close-ups, to create a dynamic view that emphasizes the shoe’s unique design elements.
- Background and Props: Choosing the right background and props is essential to make the shoes stand out. A simple, uncluttered background can keep the focus on the shoes, while themed props can add context and narrative, enhancing the overall aesthetic appeal of the image.
- Styling and Composition: The way a shoe is styled in the frame plays a key role in shoe photography. This includes the arrangement of the shoes, the use of complementary colors, and how they fit within the overall composition to create a visually appealing image that draws the viewer’s eye.
- Post-Processing Techniques: Post-processing is often employed to enhance shoe photographs further. Techniques such as color correction, sharpening details, and adjusting contrast can elevate the image, making the shoes appear more appealing and true to life in terms of color and texture.
What Essential Equipment Do You Need for Best Shoe Photography?
To achieve the best shoe photography, several essential pieces of equipment are necessary.
- Camera: A good quality DSLR or mirrorless camera is crucial for capturing high-resolution images with excellent detail. These cameras offer manual controls and superior performance in low-light conditions, allowing for creative flexibility in various shooting environments.
- Lens: A macro or prime lens is recommended for shoe photography as it allows for sharp focus on intricate details while maintaining a beautiful bokeh effect. A lens with a focal length of 50mm to 100mm is ideal for close-up shots that highlight the textures and materials of the shoes.
- Tripod: A sturdy tripod is essential for stability, especially during long exposure shots or when using a slower shutter speed. This equipment helps to eliminate camera shake and ensures that your images are crisp and clear, particularly in low-light settings.
- Lighting Equipment: Proper lighting is key to showcasing the shoes effectively. Softbox lights or portable LED panels can provide even, diffused lighting that reduces harsh shadows and highlights the shoe’s colors and textures accurately.
- Reflectors: Using reflectors can help bounce light onto the shoes, enhancing details and reducing shadows. They are especially useful in outdoor settings or when working with natural light, allowing for more dynamic and visually appealing photographs.
- Backgrounds: A variety of backgrounds can drastically change the mood of your shoe photos. Solid-colored backdrops or textured surfaces such as wood or fabric can complement the shoes without distractingly competing for attention.
- Props: Thoughtfully chosen props can add context and storytelling elements to your shoe photography. Items such as clothing, accessories, or lifestyle elements can enhance the visual interest and convey the intended theme or style associated with the footwear.
- Editing Software: Post-processing tools like Adobe Lightroom or Photoshop are invaluable for refining your images. These programs allow for color correction, cropping, and retouching, ensuring that your final photos are polished and professional.
Which Cameras Work Best for Capturing Shoes?
The best cameras for capturing shoes effectively combine quality optics, resolution, and versatility to highlight details and textures.
- DSLR Cameras: These cameras offer superior image quality and the ability to change lenses, making them ideal for shoe photography.
- Mirrorless Cameras: Compact and lightweight, mirrorless cameras provide excellent image quality and fast autofocus, which is beneficial for capturing sharp details of shoes.
- Smartphone Cameras: Modern smartphones come equipped with advanced camera technology and editing apps, making them a convenient option for capturing stylish shoe shots on the go.
- Point-and-Shoot Cameras: These cameras are user-friendly and portable, which can be great for casual shoe photography without the complexity of interchangeable lenses.
- Medium Format Cameras: For professional shoe photography, medium format cameras deliver stunning detail and dynamic range, making them perfect for high-end fashion shoots.
DSLR cameras, such as those from Canon or Nikon, provide extensive control over settings and the ability to use macro lenses for close-up shots, allowing photographers to capture intricate details and textures of shoes. Their larger sensors also contribute to better performance in low-light conditions, which can be advantageous during indoor shoots.
Mirrorless cameras, like those from Sony or Fujifilm, are becoming increasingly popular due to their smaller size and lighter weight while still offering high-quality images. They often feature fast autofocus systems, which can help in capturing the dynamic angles of shoes during action shots or when styling them in various settings.
Smartphone cameras, particularly those from Apple and Google, have advanced significantly and often include multiple lenses and powerful editing software. Their convenience allows for quick captures and the ability to share images directly on social media, making them perfect for influencers or casual photographers looking to showcase their footwear.
Point-and-shoot cameras, such as those from Canon or Panasonic, provide a straightforward approach to photography without the need for extensive technical knowledge. They are compact and easy to carry, making them suitable for spontaneous shoe photography sessions.
Medium format cameras, like those from Hasselblad or Phase One, are the go-to choice for high-end fashion photographers. These cameras offer exceptional image resolution and color accuracy, which are crucial for highlighting the fine details and textures of premium footwear.
What Lenses Are Optimal for Shoe Photography?
When it comes to capturing stunning images of shoes, certain lenses can greatly enhance the quality and aesthetics of your photography.
- 50mm Prime Lens: This lens is favored for its versatility and ability to create sharp images with beautiful bokeh. Its wide aperture allows for excellent low-light performance and the ability to isolate the subject, making it ideal for detailing shoe textures and designs.
- 85mm Prime Lens: Known for its flattering compression and sharpness, the 85mm lens is perfect for portraits that feature shoes worn by models. It allows photographers to capture the shoes in context while providing a pleasing background blur.
- Macro Lens: A macro lens is essential for detailed close-up shots of shoe features like stitching, materials, and embellishments. This lens enables photographers to get incredibly close to the subject, revealing intricate details that are often overlooked.
- Wide-Angle Lens: This lens is ideal for creative compositions and showcasing shoes in context with their environment. A wide-angle lens allows for more dynamic angles and can capture the shoes alongside other elements, such as urban landscapes or stylish backdrops.
- Tilt-Shift Lens: For those looking to achieve a unique perspective with controlled depth of field, a tilt-shift lens is a great choice. It allows for adjustments in the plane of focus, which can create miniature-like effects or enhance architectural elements in shoe photography.
How Does Lighting Affect Shoe Photography Quality?
- Natural Light: Utilizing natural light can provide a soft and flattering illumination that enhances the colors and textures of the shoes. Early morning or late afternoon light, often referred to as golden hour, produces warm tones and reduces harsh shadows, making shoes appear more vibrant and appealing.
- Artificial Lighting: Artificial lighting, such as studio lights or flash, allows for greater control over the lighting setup. This type of lighting can help eliminate shadows and highlight specific details of the shoes, but it requires careful adjustment to avoid overly harsh or unflattering effects.
- Diffused Lighting: Diffusing light through softboxes or sheer materials softens the intensity of the light, reducing harsh shadows and creating a more even illumination. This technique is particularly effective in showcasing the material and craftsmanship of shoes, giving a more professional look to the photographs.
- Backlighting: Backlighting can create a dramatic effect by illuminating the shoe from behind, emphasizing its shape and creating a sense of depth. This technique is particularly useful for transparent or translucent materials, allowing for a striking visual representation that draws attention.
- Angle of Light: The angle at which light hits the shoes can dramatically change the perception of their texture and form. Side lighting, for instance, can accentuate details and create shadows that add dimension, while frontal lighting can flatten the appearance but provide a more straightforward view of the shoe design.
What Backgrounds and Props Enhance Shoe Photography?
The right backgrounds and props can significantly enhance shoe photography by adding context and visual interest.
- Neutral Backdrops: Using solid, neutral-colored backgrounds like white, gray, or black can help the shoes stand out, allowing their details and colors to take center stage without distractions.
- Textured Surfaces: Surfaces such as wood, concrete, or fabric can add depth and interest to the composition, creating a more dynamic image while maintaining a focus on the footwear.
- Natural Elements: Incorporating elements like plants, stones, or sand can evoke a specific mood or theme, making the shoes feel more relatable and appealing within an outdoor or lifestyle context.
- Fashion Accessories: Props like bags, hats, or jewelry can complement the shoes and help convey a complete style narrative, illustrating how the shoes fit into an overall outfit.
- Lighting Equipment: Use of softboxes or reflectors can enhance the lighting quality, reducing harsh shadows and highlighting the shoe’s features, making them appear more inviting and attractive.
- Colorful Backdrops: Bright, colorful backgrounds can create a bold statement and energize the image, making it stand out, particularly useful for trend-focused or youth-oriented shoe brands.
- Contextual Settings: Shooting the shoes in relevant environments, such as a gym for athletic shoes or a cityscape for casual wear, can provide context that resonates with the target audience and showcases the shoes in action.
How Can You Improve Composition in Shoe Photography?
Improving composition in shoe photography involves several key techniques and considerations.
- Lighting: Proper lighting is crucial for showcasing the details and textures of shoes. Natural light is often the best option, as it provides a soft illumination that enhances colors and reduces harsh shadows. Alternatively, using a lightbox can create a controlled environment where you can manipulate light to highlight specific features of the shoe.
- Background: The background can significantly impact the overall composition of the photo. A clean, uncluttered background helps draw attention to the shoe itself, while textured or colorful backgrounds can add interest and context. Consider using contrasting colors or materials that complement the shoe design for a more dynamic look.
- Angles: Experimenting with different camera angles can create unique perspectives that make your shoe photography stand out. Shooting from a low angle can give shoes a more imposing presence, while overhead shots can showcase their design and structure. Don’t be afraid to try unconventional angles to capture the shoe in a way that tells a story.
- Framing: Utilizing framing techniques can add depth and focus to your shoe photography. This can be achieved by incorporating elements from the environment, such as props or other objects, to create a natural frame around the shoe. Doing so draws the viewer’s eye directly to the subject and enhances the composition.
- Rule of Thirds: Applying the rule of thirds is a fundamental compositional technique that can greatly enhance your images. By dividing the frame into a grid of nine equal parts and positioning the shoe along these lines or their intersections, you create a more balanced and engaging photograph. This technique encourages viewers to explore the entire image rather than just fixating on the center.
- Details and Close-ups: Highlighting specific details of the shoe can provide a more intimate view and emphasize craftsmanship. Close-up shots of textures, stitching, or unique design elements can tell a story and engage the viewer. Including a mix of wide shots and detail shots can create a comprehensive narrative about the shoe.
- Post-Processing: Editing your photos can significantly enhance their final appearance. Adjusting brightness, contrast, and saturation can help bring out the shoe’s colors and textures. Additionally, cropping and straightening can improve composition and eliminate distracting elements that might take attention away from the shoe.
What Editing Techniques Can Elevate Your Shoe Photography?
- Color Correction: Adjusting the colors in your shoe photographs can make them more vibrant and true to life. This process involves balancing the white balance, enhancing saturation, and correcting any color casts to ensure that the shoes appear as they do in reality.
- Background Removal: Isolating the shoes from their background allows for a cleaner and more focused image. This technique can help eliminate distractions, making the shoes the central element of the photograph, which is particularly effective for product listings or promotional materials.
- Sharpening: Applying sharpening techniques enhances the detail and texture of the shoes, making them stand out more prominently in the image. This is crucial for showcasing materials, stitching, and other intricate details that can attract potential buyers.
- Contrast Adjustment: Tweaking the contrast helps to define the shapes and forms of the shoes, adding depth and dimension to the images. By increasing contrast, the highlights become brighter while shadows deepen, creating a more dynamic and visually appealing photograph.
- Vignetting: Adding a subtle vignette can draw attention to the shoes by darkening the edges of the photograph. This technique helps to create a focal point on the shoes and can contribute to a more professional-looking image overall.
- Cloning and Healing: This technique involves removing any imperfections or distractions in the image using cloning or healing tools. By cleaning up scuffs, dust, or unwanted elements, the final image will appear polished and more appealing to viewers.
- Text Overlay: Adding text overlays can provide additional information about the shoes, such as brand, model, or features. This technique is effective for marketing purposes, as it can help convey the shoes’ selling points directly within the image.